- Quadrocopterschevron_right
- Helicopterschevron_right
- Aircraft and gliderschevron_right
- Tethered modelschevron_right
- Rocketschevron_right
- Boatschevron_right
- Carschevron_right
- RC equipmentchevron_right
- Electrical equipmentchevron_right
- Power: Batteries and accessorieschevron_right
- Chargers and accessorieschevron_right
- Cameras, FPV + accessorieschevron_right
- Simulators and accessorieschevron_right
- Rubber driveschevron_right
-
Electric driveschevron_right
- Electric motorschevron_right
- Speed regulatorschevron_right
- Combo setschevron_right
- Tunnel driveschevron_right
- Propellerschevron_right
- Propeller coverschevron_right
- Hubs
- Gearschevron_right
- Accessories
- Diesel driveschevron_right
- Starter accessorieschevron_right
- Fuels, oils, lubricantschevron_right
-
Materials and accessories for constructionchevron_right
- EPP and foams - boardschevron_right
- Exotic wood and otherschevron_right
- Veneer
- Balsachevron_right
- Plywoodchevron_right
- Forms, plates, etc ...chevron_right
- Fabrics, mats, sleeves, etc..chevron_right
- Covering materialschevron_right
- Rodschevron_right
- Tubeschevron_right
- Pinschevron_right
- Moldingschevron_right
- Flat barschevron_right
- Brass and copper wire
- Angles - channelschevron_right
- Bowden + sockets
- Snaps and wrists
- Hinges, others
- Aileron and rudder levers
-
Bolts, nuts - jointschevron_right
- Steel bolts
- Stainless screws
- Aluminum screws
- Plastic screws
- Threaded rods
- Nuts, sockets - steel
- Stainless nuts
- Nuts, sockets - aluminum
- Brass nuts
- Plastic nuts.
- Steel washers
- Stainless steel washers
- Plastic washers.
- Rubber pads
- Screws
- Pins
- Sleeves
- Rings
- Cufflinks
- Tensioners
- Rivets
- Split pins
- Springs
- others
- Pulleys
- Bearings
- Chassischevron_right
- Wheelschevron_right
- Fairings
- Brakes
- Rubber
- Pilots
- On-board instruments
- Neodymium magnetschevron_right
- Pneumatics, hydraulics, etc.chevron_right
- Other
- Resins, adhesives, varnishes, tapeschevron_right
-
Modeling toolschevron_right
- Measuring
- Setting instruments
- Balancers
- Magnifiers
- Screwdrivers
- Keys
- Pliers - pliers
- Cutting
- Balls and saw blades
- Abrasive ( files, grinding wheels....)
- Electric
- Knives, scissors, chisels ...chevron_right
- Foil irons
- Solderingchevron_right
- Pullers
- Tweezers
- Drills, drillschevron_right
- Dies - taps
- Reamers
- Brushes and brushes
- Varnishing - Airbrushes etc.chevron_right
- Lighting
- Crimping tools for connectors
- others
- Protective
- Modeling plans
- Newspapers, books and filmschevron_right
- Smoke candles, systems, etc.chevron_right
- Boutiquechevron_right
- Toys
- Sale
- Modeling market
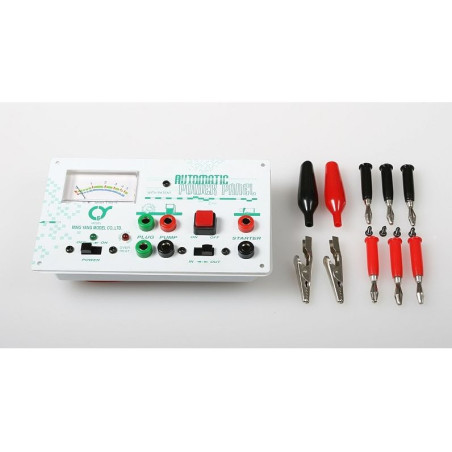
Q-Model's universal launch panel, designated 212-3, can be installed in the launch box.
It is equipped with all the necessary outputs needed for efficient and fast starting of the combustion model:
- output for a candle filament (1.5V) with an amperage indicator
- output for a pump (12V) with the possibility of reversing the direction of operation (pumping / suction) and a convenient ON/OFF switch
- output for a starter (12V)
Taking care of the convenience of work and hassle-free preparation of current connections, a set of 6 4mm banana plugs with red and black plastic housings, respectively, is included, as well as two pairs of crocodile pliers for connection to the gel battery.
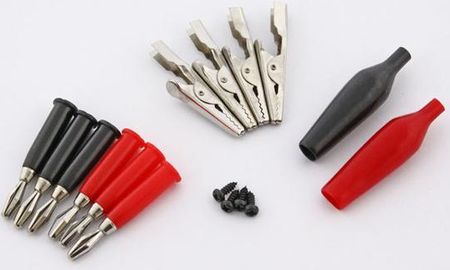
The installed ON/OFF switch helps save battery current when not using the panel.
The panel is powered by 12V direct current (preferably a 12V Pb gel battery)
The standard dimensions of 152 x 91 mm of the panel will ensure trouble-free installation in virtually any model box on the market (4 mounting screws included in the package). The manufacturer has also included a very useful lightweight ABS extrusion to protect the underside of the panel from possible mechanical damage or splashing.
Operating instructions:
- Connect the 12V battery to the panel using the "outgoing" wires
- Connect the12V starter to the sockets in the "STARTER" field.
- In the "PUMP" field, connect the fuel pump to the 12V socket .Use the "IN-OUT" switch to refuel or pump fuel out of the model.
- In the "PLUG" field, connect the glow plug power supply (using the OFF-ON POWER switch we "feed" current to the glow plug)
- CAUTION ! Do not confuse the poles ! (risks damaging the panel) black socket (-) red socket (+).